Epson WorkForce 610 Color Inkjet All-In-One Printer

This remarkable product manages to print documents up to two-times faster than leading color inkjet alternatives from competitive companies...

Activate Account Administrator di Windows 7 dan Vista : > "Run as administrator"...

HOW TO COPE VIRUS SHORTCUT 1234 RUNMIT

The characteristics of affected Virus 1234 Shortcut: 1. Shortcut Virus 1234 Runmit WATERMARK.EXE this will make the existing file in two places, namely:...

HOW TO SOLVE ERROR C000 ON CANON PIXMA MX870

How to solve error C000 on Canon Pixma MX870 Solution 1: Switch off the printer Disconnect the power cable Open door: ....

SPESIFIKASI TOSHIBA SATELLITE L645-1147XB

Spesifikasi Laptop Toshiba Satellite L645-1147XB O/S: Microsoft Windows 7 Home Premium Processor: Intel® Core™ i5-480M Processor (2.67 GHz, Cache 3 MB). Chipset: Intel HM55. Memory: 2 GB DDR3 SODIMM PC-8500, Max. Memory 8 GB (2 DIMMs) Graphics Engine: ATI Mobility Radeon HD 5470 512 MB...

Saturday, July 9, 2011

How to Service LCD Monitor

We live in a world of electronic gizmos, and like all things built by man, they will eventually fail, sometimes sooner that we would like. There comes that time, the moment that you realize that a device you have depended on for years has failed.

In this case it was my wife who pointed out the trouble. Her computer monitor was beginning to display a rippling pattern across the display. At first it wasn't too bad, but gradually got worse, to the point that using the display was very annoying. When she begins to make noises about a trip to
Costco for a replacement it is time to take action. The display is about to become trash one way or another, no risk in taking it apart and seeing what has gone wrong. Maybe there is a chance I can rescue it.

The display was a relatively new ViewSonic VA1912wb LCD monitor that is the primary display for my wife's desktop machine. The problem manifested as a series of horizontal dark lines that moved rapidly top to bottom on the display, appearing like the monitor had a problem with horizontal hold, as if such a thing could happen to a modern LCD monitor.

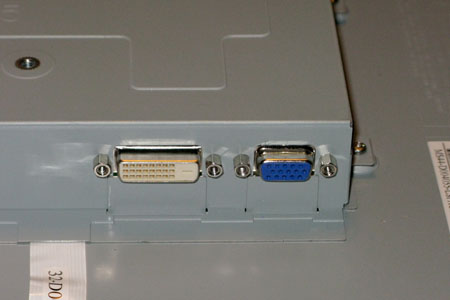
The VGA and DVI connectors, remove the four 3/16" hex studs
I did have a decent idea of what was wrong. The most failure prone electronic components are electrolytic capacitors, particularly those in commodity electronics like desktop computers and LCD monitors. Manufacturers are cutting costs wherever possible, sometimes they cut too far. I know, I have been in that situation, under pressure to cut a few pennies out of a design to reduce costs. I don't think I ever let them press me too far, but recent history is replete with examples of where it has happened. Failed filter capacitors in the power supply would result in a failure exactly like we were seeing on the screen. The monitor in question has a built in AC/DC power supply, I knew this is where I would start.

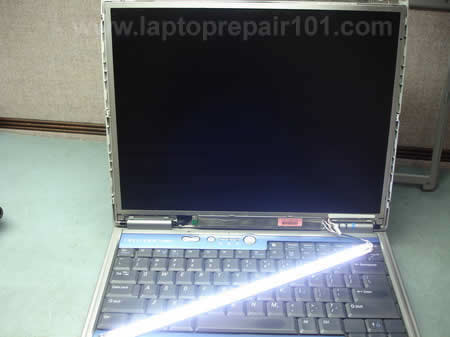
The challenge was in simply getting the monitor open. The case is a simple clamshell with a backshell and a bezel that surrounds the screen. This was secured with two screws, found under the desktop stand, and small detent style clips all the way around the outside edge. Separating the clips took a fair amount of force while prying with a slim tool. I did mark up the case a bit, marring the finish in a few places. But as the marks are on the back of the monitor I was not too worried, the priority was on preserving the front and the LCD screen itself.


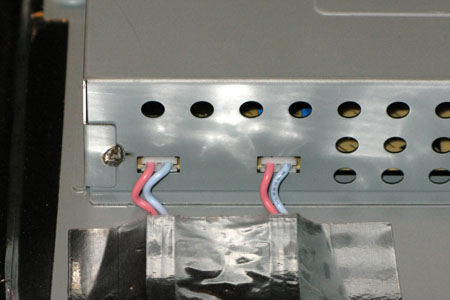
Backlight power high voltage connectors, remove by gently prying out
Once I finally got the case apart things got a lot easier. The control circuit and power supply are under a simple metal cover secured with a few screws. Four small connectors are found on leads for the backlight power, these are simply pulled gently free, they have no latching mechanism. The screws on the d-sub VGA connector and DVI connector must be removed, as well as the screws on the IEC power receptacle.

It was Deb who saw the trouble first. I had just gotten the power supply PCB out and was beginning to examine it. Looking over my should she pointed at some smaller electrolytic caps. Sure enough the tops were bulged outwards in a decidedly unhealthy way, even a little black discharge was present showing signs of complete failure. Removing the capacitors from the PCB and testing with an LCR meter showed zero capacitance, totally dead.


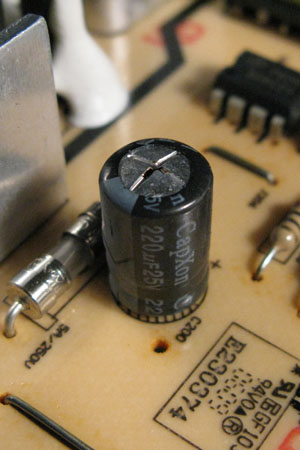
A failed electrolytic capacitor with in a Viewsonic monitor
Somewhat surprisingly it was not the main power supply, but the backlight supply on the same PCB that hosted the problem. Both caps were 470μF 25V electrolytics in a fairly small can. The caps look to be the input filter caps for the high voltage DC-DC converters that created the power for the backlights. These caps were labeled 'CapXon', a manufacturer I had never heard of. Given the relatively young age of the monitor I was not impressed, these were truly shoddy parts.

It took about twenty minutes of digging though my spares stock to find the replacements. A pair of 470μF 25V electrolytic capacitors in an only slightly taller case that fit perfectly into the PCB. The new caps were Nichicon PL series, a nice high quality power supply capacitor. No need to order parts from the mainland and wait five days to put the monitor back together. It is going to be a while before my wife makes any disparaging comments about how much of the garage is taken up by shelves and boxes of electronic components.

Solder the old parts out, solder the new caps in, then double check the polarity marked on the PCB. This was made very easy by the single sided PCB construction of the power supply, the old caps just popped out when I melted the pads with the soldering iron, leaving fairly clean holes behind ready for the new parts. I then triple checked the polarity against the photos I had taken before removing the old parts. A bit paranoid, but this comes with lengthy and painful experience. I have gotten in the habit of taking photos whenever I dismantle something, easy to do and being able to check the photos has, more than once, saved the situation when a detail gets missed.

The two capacitors that failed in this monitor were C200 and CE101. There were two other capacitors, of a different value and case size, from the same manufacturer, but I could find no suitable replacements in my spare parts, so they stayed. Hopefully I do not have to open the monitor again in a few months to replace those.

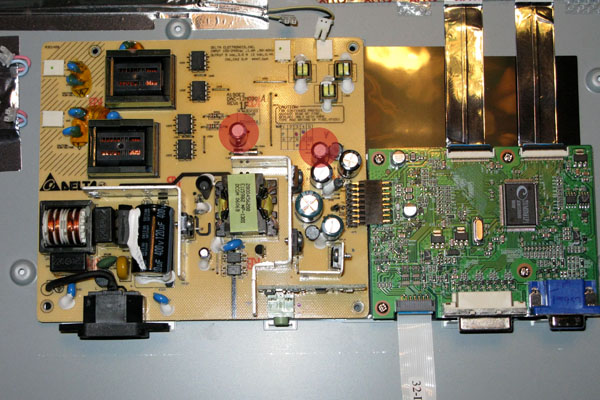
The power supply (left) and controller (right) circuit cards in a ViewSonic VA1912wb LCD monitor, the bad caps indicated in red
Reassembling the case went far more quickly. Remount the power supply PCB, insert all four screws, replace the EMI cover, and reconnect the various power leads. Simply reversal of the disassembly. What took me twenty minutes of careful prying to get apart went back together in thirty seconds, the case snapped together as it was designed.

I have heard it said, that if you want your pipes fixed, don't marry a plumber. To some extent that extends to electrical engineers as well. But sometimes I do get things fixed. Applying power and video the monitor displayed a beautiful, crisp image with no annoying ripples across the screen. This did have one other result, a happy wife, never a bad thing.

This also shows the sense in at least checking failed gear for the problem before chucking it in the dustbin. Who knows, maybe the failure is something simple and easily fixed. If you have the skills it is at least worth trying. This time it saved me a $200 19" LCD monitor.

Update... Fred Obermann had the same issues with an Acer AL2423W monitor. He has posted a series of photos that demonstrate the same process on the Acer monitor, with nice photos of failed CapXon capacitors in that monitor as well.

Friday, June 3, 2011

How to Service Broken Keyboard Connector on Laptop

This guide explains how to fix a broken keyboard connector on a laptop motherboard. I do not claim that my instructions will work for any connector type in any laptop brand, but if I can help a few people, I can call my mission accomplished.


Let’s say the keyboard in your laptop stopped working properly and you decided to install a new keyboard yourself. You disassembled the laptop, removed the keyboard, tried to unlock the keyboard connector and… OHH! MAN!… a piece of the locking clip on the connector got broken!


What can you do? Unfortunately, you don’t have a lot of options. The keyboard connector is permanently soldered to the motherboard and cannot be replaced at home. If the connector was damaged, you’ll have to replace the whole motherboard, use the laptop with an external USB keyboard, or…. try the following trick. Hopefully it works or you.


The keyboard cable is locked inside the connector on the motherboard. In order to remove the keyboard, you have to unlock the connector and release the cable.


On the picture below you see one of the most common connectors. It has the base (white in my case) and locking clip (brown in my case). The keyboard cable is jammed between the locking clip and base.
To unlock the connector, you have to move the locking clip about 2 millimeters in the direction shown by two yellow arrows.

IMPORTANT! The locking clip must stay attached to the connector base.
After that you can pull the keyboard cable (green arrow) and remove the keyboard.


If you are not careful enough, you can move the locking clip too much and break it.
On the picture below you can see the locking clip is missing the left hook.


On the next picture both sides of the clip are broken.


IMPORTANT! Do not though away the broken clip even though it looks completely useless.

If you insert the cable into the connector and will not lock it with a clip, the cable will not make good contact with pins inside the connector and the keyboard will not work.


Here’s how to install the broken clip back in place and make it work.
Position the broken clip the way it was before. In my case both sides of the connector are broken. What could have been worse?


Carefully insert the keyboard cable into the connector. Note, in this type of connector, the cable goes above the locking clip.


Carefully push the broken clip back in place. You can use a small screwdriver to push on the clip behind the cable.

The clip fits tightly when there is a cable inside the connector.


Secure the connection with sticky tape and you should be good to go. The keyboard should work just fine.


The keyboard connector shown on the following picture is very similar to the previous one. The only difference – the keyboard cable is routed under the locking clip. Fix it the same way as the previous connector.


On the next picture you see another type of keyboard connector. The cable is inserted vertically.


In order to unlock the connector, you’ll have to move the locking clip (brown piece) about 2 millimeters up in the direction shown by two yellow arrows. After that you can pull the keyboard cable (green arrow) and remove the keyboard.


If you move the locking clip too far, you can break it.
In my example the right side of the clip is broken. But you still can use it!


Insert the keyboard cable into the connector, position the broken locking clip correctly (behind the cable in my case) and carefully push it in.


Even with a broken clip the cable will make good connection with the base and the keyboard should work.


Here’s the same connector shown from the opposite side. You cannot even tell if the locking clip is broken.


If this trick worked for you, it means I just saved you a few hundred bucks on the motherboard replacement.

Tuesday, May 31, 2011

How to Fix Your Own Computer

You can upgrade or fix your own computer if you have the right information, computer tools and service manuals for your PC. As you know, hiring a professional to upgrade your PC or replace a drive, graphics card or memory, can be expensive. There are some jobs the average computer user can do on their own provided they have the right information at their fingertips. The following information will give you the knowledge you need to repair your own computer.

Essential Tools For Computer Repair

Aside from saving a lot of money, there is a lot of satisfaction when you fix your own computer or perform an upgrade to improve its performance. But you need a few things to get started. The following are a few of the essentials we feel are necessary for the beginning computer repair enthusiast:


Service manual for your computer – Most people don’t realize your computer has a detailed service manual out there on the Internet. If you go to the manufacturer of your computer (Dell, HP, etc) You will likely find several manuals online. You probably received a Quick Start sheet of paper with your new computer. But service manuals show detailed information, such as how to take apart your computer, the specifications and part numbers for everything. A detailed service manual is a must have for home computer repair.

Computer Toolkit – You will need more than just a screwdriver for most jobs. Computer tool kits are inexpensive and contain tools you probably do not have, such as precision screwdrivers, wire strippers, and Torx bits. Having the right tools can make the job easier and reduce the likelihood your computer will get damaged by a slip or gouge of a standard screwdriver.

starter computer toolkit

Read more about this great starter computer toolkit.
Computer Troubleshooting Book – Research and learn about computers in general. Learn what makes computers “go”. There are numerous parts that interact with each other and can often produce the same symptoms when there is a problem. Learn the difference between the various ports, expansion cards, memory and other hardware before you even consider fixing your own PC.

Computer Troubleshooting Book

We recommend this book for computer troubleshooting. It has extensive flowcharts that walk you through the process of figuring out what is wrong with your computer. It’s not a huge book, which makes it easy to carry around or keep handy near your PC. Read more about this Computer Troubleshooting Book.

Upgrasde PC Book

If you’re looking to know everything there is to know about computers, Upgrading and Repairing PCs (19th Edition) is a great book for that. At nearly 1200 pages, this book covers it all.

In conclusion, you can certainly perform most computer jobs on your own if you have the right service manuals, reference books and tools to perform the task.

source : http://www.pctechbytes.com

Saturday, May 28, 2011

How To Troubleshooting Laptop With Backlight Failure

This laptop came for repair because of the LCD screen backlight failure. My customer complained that the laptop LCD screen is black but the laptop works with an external monitor.


Here are my steps for troubleshooting this laptop with the backlight failure.

First of all, I tested this laptop with an external monitor connected to the VGA port and the external monitor worked absolutely fine. I was able to get crystal clear image on the external screen even though the internal screen didn’t light up. If the external screen works fine, then most likely there is nothing wrong with the video card.

Notebook display assembly diagram

After that I took a closer look at the laptop LCD and noticed that the screen is not completely black. The laptop screen still works but the image is very very dull, you barely can see it. It means that the screen still gets data signal from the video card, but for some reason the backlight lamp doesn’t work.
From my experience I know that this problem can be related the lid close switch, faulty inverter board or bad backlight lamp. I checked them one by one.

If you have a similar problem, make sure the lid close witch moves freely. The lid switch is a small button located close to the LCD screen. This button triggers the hibernation or sleep mode when the screen is closed. If the lid close switch is dirty, it might get stuck inside the laptop case and cut off the power from the inverter board. The inverter board works as a power supply for the backlight lamp and if there is no power coming to the inverter board, the backlight lamp will not light up either.

Image with pinkish tone


In my case the lid button worked properly, it didn’t stuck inside the case. When I was pressing on the button very fast, I was able to light up the screen but only for a fraction of a second. The image wasn’t bright and it had a pinkish tone. A pinkish tone usually indicates a problem with the backlight lamp, not the inverter board.

Replaced inverter board

Even though I suspected the backlight failure, I decided to test this laptop with a new inverter board just in case. But it didn’t help. The screen didn’t light up even after I replace the inverter board. So, I was right, this problem is not related to the inverter board.

Connected known good backlight lamp

Finally, I disconnected the screen backlight lamp connector from the inverter board and connected my test backlight lamp (I removed it from another cracked screen). For the test purpose, you can buy a new backlight lamp here. Try to find a backlight with the connector already attached to it, so you can plug it into the inverter board. Make sure the connector on the backlight lamp is similar to the connector on your LCD screen.

My backlight lamp works fine

As soon as I turned on the laptop, my backlight lamp lighted up. Yep, that’s the problem. The laptop screen has a faulty backlight lamp.

Here’s another laptop with backlight failure

This laptop video fails in a little bit different way. In this case the backlight lamp hasn’t failed completely.

Background has reddish tone

The laptop starts with video on the screen but the background has reddish tone, the screen flickers and it makes noticeable buzzing noise coming from the backlight and inverter area. After a few minutes the backlight turns off by itself and the buzzing noise stops. When the backlight is off, the image on the screen is still visible but it’s very dark.

Backlight lamp connected

I removed the screen bezel and connected my test backlight lamp.

Backlight works
My test backlight works absolutely fine. The lamp doesn’t flicker and there is no buzzing noise. So, this laptop needs a new backlight lamp.

source : http://www.laptoprepair101.com

Friday, May 27, 2011

How to troubleshoot laptop battery charging problems

In this post I explain how to troubleshoot laptop battery charging problems. I will list most common battery failure examples and suggest some troubleshooting steps.


Example 1.

Laptop detects the battery but shuts off when AC adapter unplugged.
When you move the cursor arrow over the battery icon while the laptop is connected to AC adapter, it show the remaining battery charge and says “charging”.


The batter power meter utility (if available) also shows that battery is connected and charging.


But… as soon as you unplug the AC adapter, the laptop shuts off completely.

Possible problems:
1. The battery not seated correctly. Try reconnecting the battery.
2. The battery contacts got dirty or oxidized and the battery is not making good connection with the motherboard. Try reconnecting the battery a few times.
3. If reconnecting the battery doesn’t help, most likely the battery is bad and has to be replaced.
4. If you replaced the battery but the problem still exists, this is motherboard related failure. Apparently the battery charging circuit has failed. In this case the whole motherboard has to be replaced (or repaired on component level).

Example 2.

The battery not detected by the laptop.
The battery is installed and you know it’s connected correctly but there is a red cross on the battery icon.


If you move the cursor arrow over the battery icon, it says “no battery detected”.

Possible problems:
1. Most likely the battery is bad. You have a very good chance to fix this problem by replacing the battery.
2. If replacing the battery doesn’t help, this is motherboard related failure. The motherboard has to be replaced (or repaired on component level).

Example 3.

The battery discharges very quickly after it reaches some critical point.


The battery detected by the laptop and charges properly to 100%.
When you unplug the AC adapter, it take normal time to discharge until some critical point (let’s say 80%) but after that the battery discharges very quickly to 0%.

Possible problems:
This is battery related failure. The battery is bad and has to be replaced.

Example 4.

The battery charges only if the power plug positioned correctly.
You have to wiggle the power plug in order to charge the battery. After you find the right position, the battery charges properly.


Possible problems:
1. AC adapter failure. The AC adapter power cable is damaged. You can test your AC adapter with a voltmeter.
2. If the AC adapter works fine, most likely this is power jack (connector where you plug power adapter) failure. In this case the power jack has to be replaced.
In some laptop models the power jack is not soldered to the motherboard, it’s attached to a power harness.


In this case, you can unplug the failed power jack from the motherboard and replace it with a new one.

source : http://www.laptoprepair101.com/laptop/2010/07/21/troubleshoot-laptop-battery-charging-problems/

Thursday, May 26, 2011

How ToTest LCD Screen Inverter in a Laptop

In this post I explain how I test the LCD screen inverter board in a laptop computer. The screen inverter failure is very similar to the backlight lamp failure. In both cases the screen gets very dark and the image on the screen becomes very faint, barely visible under a bright light.


If you suspect the inverter board failure, I know only one reliable way to test that. It’s either replacing the inverter board with a known good one and see if it works, or connecting a known good backlight lamp and see if your presumably bad inverter lights it up.


In most cases I go with the second method – testing the laptop with a known good backlight lamp. Why? Because backlight lamps are pretty much universal. The same backlight lamp will work with many different inverters as long as they have matching connectors. I’ll talk about these connectors later.


The inverter board is located inside the display panel under the LCD screen. In most laptops you can access the inverter board if you remove the LCD screen bezel. The inverter board has connectors on both ends. The left side of the inverter is connected to the LCD cable. The right side of the inverter is connected to the backlight lamp which is mounted inside the LCD screen. Check out this display diagram.
To make sure that inverter board is getting power from the motherboard (via the LCD cable), you can test it with a multimeter. In my case I connected the “+” lead of the multimeter to the pin 1 on the connector and the “-” lead to the ground trace around the screw hole. I got about 19.4V DC on that side of the inverter, so it’s getting power from the motherboard.

WARNING! If you accidentally short something on the inverter while testing it, you can damage the inverter or even the motherboard. Proceed on your own risk! Not sure? Don’t do that!


So, the inverter is getting power from the motherboard, but the screen is still dark. Apparently, it’s either bad inverter or failed backlight. Let’s test it with a known good backlight.

Here’s what I’m going to do:
1. I will unplug the LCD screen from the right side of the inverter. Basically, I’m unplugging the LCD backligth lamp which is located inside the screen.
2. I will plug in my known good backlight lamp which you can see on the picture below. Please notice that my test backlight lamp is shorter than the screen, but for the test purpose that’s OK.

Results I’m expecting:
1. If my test backlight lights up, the backlight lamp inside the screen is bad and there is nothing wrong with the inverter board. If that’s the case, you’ll have to replace the LCD screen or replace the backligth lamp (which is not easy at all).
2. If my known good backlight lamp stays dark after I turn on the laptop, most likely we have a faulty inverter board. If that’s the case, you’ll have to replace the inverter board and it’s relatively easy.


 There are two different types of backlight connectors, you can see them on the picture below. The top one (big) is not as common as the bottom one (small). I do most of my test with a backligth lamp which has a small connector.

IMPORTANT! If you decide to buy a new backlight lamp for test, you have to make sure that the connector on the lamp matches the connector on the inverter. Very often backligth lamps are sold without any wires attached. If you plan to use this backlight as a test equipment, you’ll have to find one with wires as I have on the picture 3.

You can buy a cheap backlight lamp with wires here.


Finally, when you ready to test the laptop, unplug the LCD screen from the right side of the inverter.


Plug in your test backlight lamp and turn on the laptop.


In my case, the backlight lamp lights up, so the inverter board works properly.

source : www.laptoprepair101.com

Wednesday, May 25, 2011

How To Install A Network Printer

Installing a network printer allows multiple users and computers to share a single printer, rather than having numerous personal printers throughout the home or office. When installing a network printer, make sure it is located in a centralized place so that all users can access it conveniently, then install the software on each machine. You may find that newer versions of Windows may already have the necessary drivers installed.

Finding the Printer on the Network

To install the printer using an IP address, go to Start>Control Panel>Printers and Faxes and then click the Add Printer icon. Next, click Create a new port, then select Standard TCP/IP Port from the drop-down menu. You will then be asked to enter an IP address. Enter the IP address of the print server and click Next. You will be asked to select the printer manufacturer and the model from the list. If you do not see your printer listed, insert the disk that came with the printer and click Have Disk.

If you do not know the IP address of the printer, you can sometime select Browse for printer in the beginning of the process. If the networked printer is attached to another computer is being shared, you will need to enter the name of the computer followed by the share name of the printer. For example: \\computername\printername. Newer versions of Windows (like Windows 7) make it easier to share printers through the Homegroup.


Spending extra on a network printer can save you money in the long run. Network printers can be higher grade and print cartridges can last longer than personal ink jet printers, so installing a network printer makes economical sense.

Tuesday, May 24, 2011

How to Fix Blue Screen Errors

Blue screen errors, or blue screen of death (BSOD) errors, are the most severe errors Windows can encounter. Since Windows can not recover from this kernel level error, a blue screen is displayed with the error details. The error details contain a STOP error code, which indicates the type of error.


There are a lot of possible causes for blue screen errors, but most of them relate to the computer hardware. The cause of a BSOD error can be a temperature problem, a timing error, a resource conflict, hardware failure, a corrupt registry, a virus or simply a device incompatibility or driver error.

How to analyze blue screen errors

The first thing to do to analyze a blue screen error is to check the meaning of the STOP error code. You need to stop Windows from rebooting when a STOP error is encountered. Once the blue screen of death is shown, you can check the meaning of the STOP error code. Together with the filename of the driver or module, this will give an indication of the error cause.

Another option to analyze the cause of the blue screen error is to look at the Windows system event log or to debug the memory dump (minidump) that Windows created when the error occurred. The event log can be viewed using the event viewer. Right-click Computer in the Start menu, and then select Manage. In the Computer Management window select Event Viewer. The information in the event log can be of great help to isolate the cause of the blue screen error.

Reading the minidump requires a bit more technical knowledge, but Microsoft has tools to read the minidump.
Blue Screen Of Death

The most common cause of blue screen errors

In reality, the most common cause of blue screen errors is a device driver problem. Outdated, incorrect or corrupt drivers can cause the system to encounter a STOP error, resulting in the BSOD.
So the easiest way to try and fix a blue screen error is to reinstall and update your system’s device drivers. This will ensure that all driver bugs are fixed and that all hardware has the correct driver.

If you know which device caused the error, you can update or reinstall that driver first. The file name in the blue screen of death can help identify the driver. Look for a file with the .SYS extension and search for that file name.

If you do not have the drivers for all devices, or are not comfortable updating your PC’s drivers manually, you can use a driver update tool to find, download and update all device drivers for you. Such tools will accurately identify your computer hardware, including any device causing an error, and automatically install the latest drivers for it.

In most cases updating or reinstalling drivers will solve your blue screen errors.

Other causes of blue screen errors

However, if updating device drivers does not fix the blue screen error, there are a number of additional things to try:
  • Load the default BIOS values – resource conflicts and timing issues can be caused by incorrect BIOS settings.
  • Update the BIOS – especially after adding new hardware or installing a Windows service pack this can help fix issues.
  • Update Windows – missing updates, including service packs can be a source of stop errors.
  • Check your system – run a virus scan and spyware scan after updating your definition files.
  • Run a memory test to check your computer’s RAM. Memory faults can easily cause blue screen errors, so see if your RAM is error free. Vista and Windows have a built-in option to test the memory, for XP you can use a program called memtest86.
  • Driver rollback – if you have recently updated a driver, you can use the driver rollback to revert back to the previous driver version.

List of STOP Errors Causing BSOD:

  • Stop 0×00000003 UNSYNCHRONIZED_ACCESS
  • Stop 0x0000000A IRQL_NOT_LESS_OR_EQUAL
  • Stop 0x0000001E KMODE_EXCEPTION_NOT_HANDLED
  • Stop 0×00000023 FAT_FILE_SYSTEM
  • Stop 0×00000024 NTFS_FILE_SYSTEM
  • Stop 0x0000002E DATA_BUS_ERROR
  • Stop 0x0000003F NO_MORE_SYSTEM_PTES
  • Stop 0×00000044 MULTIPLE_IRP_COMPLETE_REQUESTS
  • Stop 0×00000050 PAGE_FAULT_IN_NONPAGED_AREA
  • Stop 0x0000006B PROCESS1_INITIALIZATION_FAILED
  • Stop 0×00000073 CONFIG_LIST_FAILED
  • Stop 0×00000074 BAD_SYSTEM_CONFIG_INFO
  • Stop 0×00000076 PROCESS_HAS_LOCKED_PAGES
  • Stop 0×00000077 KERNEL_STACK_INPAGE_ERROR
  • Stop 0×00000079 MISMATCHED_HAL
  • Stop 0x0000007A KERNEL_DATA_INPAGE_ERROR
  • Stop 0x0000007B INACCESSIBLE_BOOT_DEVICE
  • Stop 0x0000007E SYSTEM_THREAD_EXCEPTION_NOT_HANDLED
  • Stop 0x0000007F UNEXPECTED_KERNEL_MODE_TRAP
  • Stop 0x0000008E KERNEL_MODE_EXCEPTION_NOT_HANDLED
  • Stop 0x0000009C MACHINE_CHECK_EXCEPTION
  • Stop 0x0000009F DRIVER_POWER_STATE_FAILURE
  • Stop 0x000000BE ATTEMPTED_WRITE_TO_READONLY_MEMORY
  • Stop 0x000000C2 BAD_POOL_CALLER
  • Stop 0x000000C4 DRIVER_VERIFIER_DETECTED_VIOLATION
  • Stop 0x000000CA PNP_DETECTED_FATAL_ERROR
  • Stop 0x000000CB DRIVER_LEFT_LOCKED_PAGES_IN_PROCESS
  • Stop 0x000000CE DRIVER_UNLOADED_WITHOUT_CANCELLING_PENDING_OPERATIONS
  • Stop 0x000000D1 DRIVER_IRQL_NOT_LESS_OR_EQUAL
  • Stop 0x000000D5 DRIVER_PAGE_FAULT_IN_FREED_SPECIAL_POOL
  • Stop 0x000000D8 DRIVER_USED_EXCESSIVE_PTES
  • Stop 0x000000DA SYSTEM_PTE_MISUSE
  • Stop 0x000000EA THREAD_STUCK_IN_DEVICE_DRIVER
  • Stop 0x000000ED UNMOUNTABLE_BOOT_VOLUME
  • Stop 0x000000F2 HARDWARE_INTERRUPT_STORM
  • Stop 0x000000FC ATTEMPTED_EXECUTE_OF_NOEXECUTE_MEMORY
  • Stop 0x000000FE BUGCODE_USB_DRIVER
  • Stop 0xC0000218 UNKNOWN_HARD_ERROR
  • Stop 0xC000021A STATUS_SYSTEM_PROCESS_TERMINATED
  • Stop 0xC0000221 STATUS_IMAGE_CHECKSUM_MISMATCH
  • Stop 0xC0000244 STATUS_AUDIT_FAILED
Please share your own experiences with blue screen of death errors, including possible solutions. New insights can help others, or maybe we can help you with specific STOP errors.

Related Posts Plugin for WordPress, Blogger...